Setting up a scanner for remote desktop
In the era of digital development, remote work is becoming increasingly popular. It is important to use technology to ensure the efficiency of the entire team. A remote desktop scanner allows employees to work with documentation from anywhere in the world. This technology significantly speeds up the exchange of information, which reduces the time it takes to complete work tasks. In our guide, we will tell you how to properly configure a scanner for a remote desktop and avoid common mistakes.
Understanding Remote Desktop Scanning
Let’s first understand what scanning documents remotely is. Its unique technology allows you to scan documents from anywhere in the world. The remote scanner is connected to the administrator’s computer. The administrator gives access to use equipment from other devices. Users go to the devices folder, select the desired option and perform all the necessary actions. Remote access allows you to use the scanner in the same way as if it were connected directly to your computer.
Choosing the Right Scanner for Remote Desktop
For the technology to work effectively, you need to choose a suitable scanner. First, pay attention to scanner compatibility with remote desktop. This feature is available in many modern models. If it is not there, you need to install an additional extension.
Also, you need to consider:
- compatibility of the scanner with your software;
- equipment productivity (scanning speed and quality);
- security level;
- availability of additional functions.
If a large company needs a scanner for remote desktops, it should pick equipment that can handle large volumes of documentation. It could be an Epson WorkForce ES-500W or a Fujitsu ScanSnap iX1500. These are productive models that will provide high levels of productivity.
For small amounts of work, you can decide on the Canon imageFORMULA DR-C225W II or Brother ADS-2700W — these compact devices have high productivity rates.
Configuring Scanners for Remote Desktop Access
The first step in setting up the scanner for remote desktop is installing the equipment’s drivers. Typically, these are downloaded automatically when the equipment is connected to the computer, but sometimes, a manual download and installation process is required.
Before setting up remote access, it is worth testing the scanner. It will help you understand how the technique works correctly. After that, you can start setting up remote access. You need:
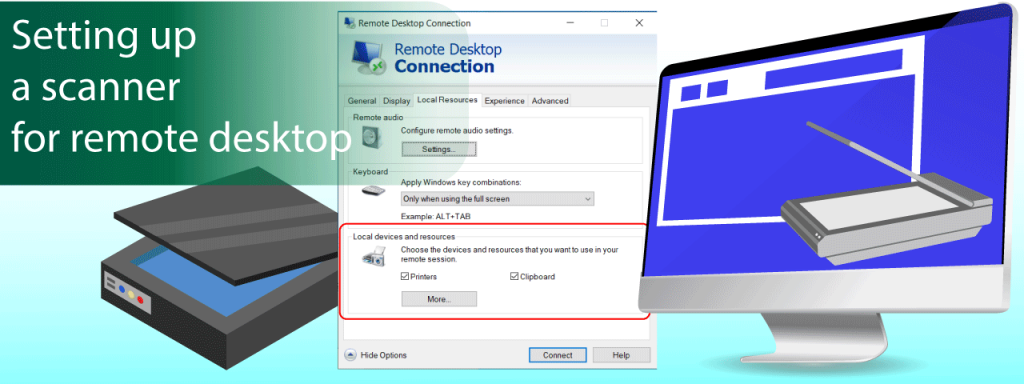
- install a program for remote access (this could be RDP, Citrix, VNC or another option that you chose);
- open program window;
- select the required scanner;
- connect to device;
- perform all necessary actions;
- disconnect from the remote scanner.
If you did not do it correctly, the technology will operate normally. However, connection errors may cause difficulties when operating remote desktop scanning software. In this case, it is worth checking that the drivers are up-to-date, reconnecting the scanner, and restarting the technology.
Difficulties in operating the technology may arise due to network problems. This occurs due to heavy load on the network or when many users use the technology at the same time. In this case, you can reboot the router or just wait until the scanning queue decreases.
Security Considerations in Remote Scanning
It is essential to ensure high security when using remote access to avoid data leakage. Technologies use encryption of the information flow, eliminating information interception and unauthorized access.
Remote access technologies allow you to control who can use the remote desktop scanner. The administrator can open or close access as needed. In addition, you can set restrictions on access to specific folders and devices. That is, users will only see the scanner and cannot open other folders on the administrator’s computer.
Enhancing Scanning Performance in Remote Desktop Environments
It is important to keep remote scanners productive to work effectively remotely. By following our advice, you will be able to maintain a high level of equipment performance and avoid work delays.
Foremost, you should pay attention to network optimization. It is better to give preference to a high-speed connection. It will ensure that the scanner for the remote desktop works quickly and will avoid time delays. In addition, such networks cope well with heavy loads.
The second point necessary to ensure efficiency is timely software updates. This applies to both the remote access program and the scanner drivers. Installing updates will help you avoid errors and malfunctions. In addition, developers often add new features that will help you maintain high productivity.
Third: Manage your scanner settings. Some models allow you to compress an image without losing quality. This allows you to transfer documents much faster, and due to compression, they will take up much less storage space.
Advanced Scanning Features and Integration
With advanced scanning features, you can significantly improve your documentation experience. For example, you can use optical character recognition (OCR). This technology recognizes text during scanning and makes it searchable and editable, a great assistant for those who work with large amounts of information.
You can also use data mining. It automatically recognizes essential information when scanning, allowing you to process and categorize documents faster.
Integrating a remote desktop scanner with cloud storage will help simplify information access. To improve work processes, you can give access keys to all employees.
Using a remote scanner can significantly improve your work efficiency. The technology allows remote employees to quickly obtain the necessary information and access the necessary documents. Setting up a scanner for a remote desktop is not a very complicated process, which you can easily figure out if you follow the instructions. Tips to improve productivity and security will help you make the most of your technology for your business.